개발환경
이번 장의 내용을 응용해서 프로젝트에 맞는 개발 환경 구성할 수 있습니다.
윈도우 환경이라고 가정하며, Eclipse 에서 GlueSDK를 사용할 수 있도록 개발환경을 구성합니다.
- Glue Plugins
- GlueSDK
- Local Repository
주요 디렉토리 구조는 다음과 같다고 가정합니다.
/infra/jdk1.8.0_192
/infra/apache-maven-3.5.4
/infra/GlueSDK
/ide/eclipse
/workspace
GluePlugin 설치
GluePlugin은 Eclipse의 dropins 폴더에 복사하면, Eclipse 실행시에 로딩됩니다.
-
다운로드
아래 사이트에 로그인 후 GluePlugin을 다운로드합니다(게스트로그인 » 교육용패키지 » 기타파일).
교육용패키지로 이동해서 기타파일에서 GluePlugin을 찾아서 다운로드합니다. - 설치(압축풀기)
Eclipse가 실행중 일 경우, Eclipse를 종료한 후 압축을 풉니다.
Eclipse는C:\ide\eclipse에 설치했다고 가정합니다.$ cd ~/Downloads $ unzip eclipse_plugins\(2.0.4\).zip -d /c/ide/eclipse/dropins $ ls /c/ide/eclipse/dropins -l - 확인(Eclipse)
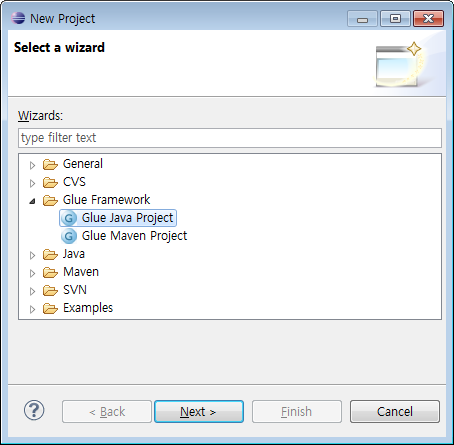
Eclipse를 실행해서, 메뉴 » File » New » Project 를 실행합니다.
Wizard창에서 Glue Framework 을 확인할 수 있습니다.
GlueSDK
GlueSDK는 Eclipse의 workspace별로 지정합니다.
-
다운로드
- 설치(압축풀기)
$ cd ~/Downloads $ unzip GlueSDK-5.1.0-RELEASE.zip -d /c/infra $ ls /c/infra/GlueSDK -l -
GlueSDK Location 설정

- Eclipse 재시작
Glue Activity Diagram 과 관련된 설정은 Eclipse 재시작을 필요로 합니다.
Eclipse 실행시, GluePlugin이 로딩되면서, GlueSDK/config/glue-config.xml를 확인합니다.
Local Repository 구성
Glue Framework 은 Maven Central Repository에 등록되어 있지 않기 때문에 Local Repository 에 직접 추가합니다.
glue-framework library
Eclipse에서 Glue Maven Project 유형의 Project를 생성하면, pom.xml 에 다음과 같은 dependency를 확인할 수 있습니다.
<dependency>
    <groupId>com.poscoict.glueframework</groupId>
    <artifactId>glue-core</artifactId>
    <version>5.1.0-RELEASE</verion>
</dependency>
다음 순서로 Local Repository에 artifact 들을 추가합니다.
- GlueSDK 의 repo 디렉토리로 이동
$ cd /c/infra/GlueSDK/repo $ ls -l - mvn install:install-file 커맨드 수행
순서대로 4개를 실행합니다.$ mvn install:install-file -Dfile=glue-framework-5.1.0-RELEASE.pom -DpomFile=glue-framework-5.1.0-RELEASE.pom $ mvn install:install-file -Dfile=glue-schema-5.1.0-RELEASE.jar -DpomFile=glue-schema-5.1.0-RELEASE.pom $ mvn install:install-file -Dfile=glue-util-5.1.0-RELEASE.jar -DpomFile=glue-util-5.1.0-RELEASE.pom $ mvn install:install-file -Dfile=glue-core-5.1.0-RELEASE.jar -DpomFile=glue-core-5.1.0-RELEASE.pom - glue-ucube, glue-push는 dependecy를 충족시킨후에 커맨드 수행(생략)
$ mvn install:install-file -Dfile=glue-ucube-5.1.0-RELEASE.jar -DpomFile=glue-ucube-5.1.0-RELEASE.pom
$ mvn install:install-file -Dfile=glue-push-5.1.0-RELEASE.jar -DpomFile=glue-push-5.1.0-RELEASE.pom
archetype
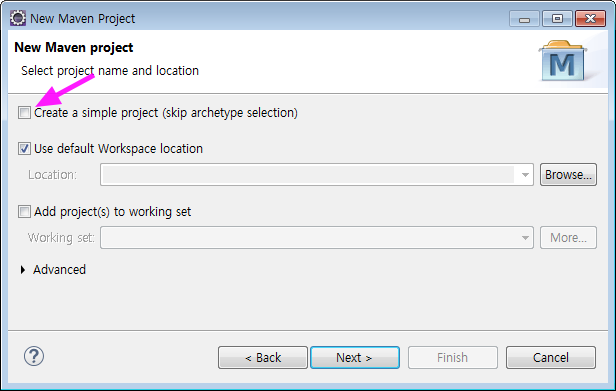
Eclipse에서 Maven Project 생성시 Create a simple project(그림)를 체크하지 않으면 archetype 를 선택해서 프로젝트를 생성할 수 있습니다.
- archetype 확보
- base-archetype-0.0.2.jar
- cqrs-archetype-0.0.2.jar
- mvn install:install-file 커맨드 수행
$ mvn install:install-file -Dfile=archetype-parent-0.0.2.pom -DpomFile=archetype-parent-0.0.2.pom -Dpackageing=pom $ mvn install:install-file -Dfile=base-archetype-0.0.2.jar -DpomFile=base-archetype-0.0.2.pom -Dpackaging=jar $ mvn install:install-file -Dfile=cqrs-archetype-0.0.2.jar -DpomFile=cqrs-archetype-0.0.2.pom -Dpackaging=jar - mvn archetype:update-local-catalog 커맨드 수행
$ mvn -f base-archetype-0.0.2.pom archetype:update-local-catalog $ mvn -f cqrs-archetype-0.0.2.pom archetype:update-local-catalog - archetype-catalog.xml 파일확인
.m2 (사용자홈디렉토리 밑에 있음)$ ls /c/Users/Administrator/.m2/ -l - Eclipse에서 Local Catalog 추가
메뉴 » Window » Preferences » Maven » Archetypes
